Rendering with custom renderer
This example demostrates how to extend the framework using user-defined plugins, where we demostrate how to create user-defined renderer by implementing lm::Renderer interface. We will implement the extension using C++ as a plugin. The implementation is defined in renderer_ao.cpp (code):
#include <lm/lm.h>

LM_NAMESPACE_BEGIN(LM_NAMESPACE)

class Renderer_AO final : public Renderer {
private:
    Scene* scene_;
    Film* film_;
    long long spp_;
    int rng_seed_ = 42;

public:
    virtual void construct(const Json& prop) override {
        scene_ = json::comp_ref<Scene>(prop, "scene");
        film_ = json::comp_ref<Film>(prop, "output");
        spp_ = json::value<long long>(prop, "spp");
    }

    virtual Json render() const override {
        const auto size = film_->size();
        parallel::foreach(size.w*size.h, [&](long long index, int threadId) -> void {
            thread_local Rng rng(rng_seed_ + threadId);
            const int x = int(index % size.w);
            const int y = int(index / size.w);
            const auto ray = path::primary_ray(scene_, {(x+.5_f)/size.w, (y+.5_f)/size.h});
            const auto hit = scene_->intersect(ray);
            if (!hit) {
                return;
            }
            auto V = 0_f;
            for (long long i = 0; i < spp_; i++) {
                const auto [n, u, v] = hit->geom.orthonormal_basis_twosided(-ray.d);
                const auto d = math::sample_cosine_weighted(rng.next<Vec2>());
                V += scene_->intersect({hit->geom.p, u*d.x+v*d.y+n*d.z}, Eps, .2_f) ? 0_f : 1_f;
            }
            V /= spp_;
            film_->set_pixel(x, y, Vec3(V));
        });
        return {};
    }
};

LM_COMP_REG_IMPL(Renderer_AO, "renderer::ao");

LM_NAMESPACE_END(LM_NAMESPACE)
In the first line you want to include lm.h. The header provides everything necessary to use Lightmetrica in C++. lm::Material interface provides several virtual function to be implemented. In this example, we implemented two functions: lm::Component::construct() and lm::Renderer::render().
lm::Component::construct() function provides a type-agnostic way to initialize the instance with JSON values. You want to implement main logic of the renderer inside the lm::Renderer::render() function. We will not explain the detail here, but this renderer implements a simple ambient occlusion. As for the usage of APIs, please refer to the corresponding references for detail.
Once you prepared the code, you can easily build the plugin with lm_add_plugin in the CMake script. To use the function, you need to include LmAddPlugin.cmake. You want to specify the name of the plugin with NAME argument. The dynamic library of the specified name will be built. In SOURCES argugment, you can specify the sources containing component implementations.
lm_add_plugin(
    NAME functest_renderer_ao
    SOURCES
        "renderer_ao.cpp")
[1]:
import lmenv
env = lmenv.load('.lmenv')
[2]:
import os
import numpy as np
import imageio
%matplotlib inline
import matplotlib.pyplot as plt
import lightmetrica as lm
%load_ext lightmetrica_jupyter
[3]:
lm.init()
lm.log.init('jupyter')
lm.progress.init('jupyter')
lm.info()
[I|0.000] Lightmetrica -- Version 3.0.0 (rev. 70601db) Linux x64
[4]:
if not lm.Release:
    lm.debug.attach_to_debugger()
A plugin can be loaded by lm::comp::load_plugin() function where you specify the path to the plugin as an argument. You don’t want to specify the extension of the dynamic library because it is inferred according to the platform.
[5]:
lm.comp.load_plugin(os.path.join(env.bin_path, 'functest_renderer_ao'))
[I|0.013] Loading plugin [name='functest_renderer_ao']
[I|0.013] .. Successfully loaded [name='functest_renderer_ao']
[6]:
# Film for the rendered image
film = lm.load_film('film1', 'bitmap', w=1920, h=1080)

# Pinhole camera
camera = lm.load_camera('camera1', 'pinhole',
    position=[5.101118, 1.083746, -2.756308],
    center=[4.167568, 1.078925, -2.397892],
    up=[0,1,0],
    vfov=43.001194,
    aspect=16/9)

# OBJ model
model = lm.load_model('obj1', 'wavefrontobj',
    path=os.path.join(env.scene_path, 'fireplace_room/fireplace_room.obj'))

# Scene
accel = lm.load_accel('accel', 'sahbvh')
scene = lm.load_scene('scene', 'default', accel=accel)
scene.add_primitive(camera=camera)
scene.add_primitive(model=model)
scene.build()
[I|0.023] Loading asset [name='film1']
[I|0.100] Loading asset [name='camera1']
[I|0.101] Loading asset [name='obj1']
[I|0.101] .. Loading OBJ file [path='fireplace_room.obj']
[I|0.101] .. Loading MTL file [path='fireplace_room.mtl']
[I|0.428] .. Loading texture [path='wood.ppm']
[I|0.519] .. Loading texture [path='leaf.ppm']
[I|0.521] .. Loading texture [path='picture8.ppm']
[I|0.553] .. Loading texture [path='wood5.ppm']
[I|0.605] Loading asset [name='accel']
[I|0.605] Loading asset [name='scene']
[I|0.609] Building acceleration structure [name='accel']
[I|0.609] .. Flattening scene
[I|0.636] .. Building
We can use the loaded extension in the same way as build-in assets using lm::load_* function. Here we load the renderer renderer::io and process rendering.
[7]:
renderer = lm.load_renderer('renderer', 'ao',
    scene=scene,
    output=film,
    spp=5)
renderer.render()
[I|1.271] Loading asset [name='renderer']
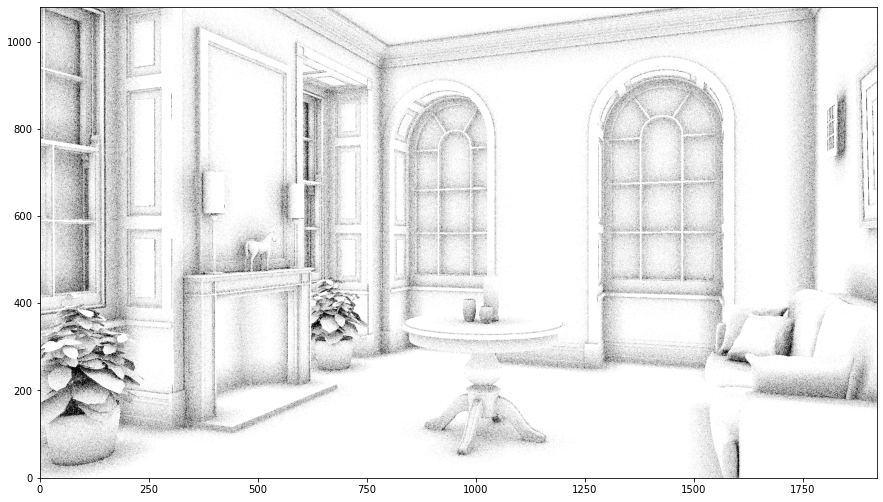
[8]:
img = np.copy(film.buffer())
f = plt.figure(figsize=(15,15))
ax = f.add_subplot(111)
ax.imshow(np.clip(np.power(img,1/2.2),0,1), origin='lower')
plt.show()